Last updated on 2020 年 10 月 30 日
在 WordPress 的世界中,每個使用者至少有一個使用者名、密碼和電子郵件。一旦創建了使用者帳號,使用者就可的登錄後台來使用 WordPress 的功能。而 WordPress 使用者的資料,會被存在 wp_user 資料表中。每個使用者都會被分配一個角色,每個角色都會有一些能力。所以,我們也可以自定義能力,我們可以利用角色來限制使用者是否可以執行哪些操作。
操作 WordPress 使用者
新增使用者
我們可以使用 wp_create_user() 或 wp_insert_user() 這兩個函式來辦到。
那這兩個差別在哪裡呢?wp_create_user() 是拿一個使用者名稱、密碼和電子郵件作為參數來建立新的使用者,而 wp_insert_user() 則是可以接受拿描述使用者及和他的屬性組成的陣列或對象來建立使用者。
用 wp_create_user() 來建立
wp_create_user(
   string $username,
   string $password,
   string $email = ''
);
這個函式的邏輯是,首先會使用 wp_slash() 轉換參數,再使用 compact() 函式把上面的值創建為陣列,然後再使用 wp_insert_user() 函式將使用者的資料插入到到資料庫中。有了概念後,我們來新增看看吧!
// 先確認看看試用者是否存在
$user_id = username_exists($user_name);

// 確認信箱也沒被用過
if (!$user_id && email_exists($user_email) === false) {
   // 建立隨機密碼
   $random_password = wp_generate_password(
      $length = 12,
      $include_standard_special_chars = false
   );
   // 建立使用者
   $user_id = wp_create_user(
      $user_name,
      $random_password,
      $user_email
   );
}
用 wp_insert_user() 來建立
wp_insert_user(
   array|object|WP_User $userdata
);
此函式創建使用者的時候,會去執行 user_register action hook,更新使用者的時候,會去執行 profile_update action hook。下面也來試試看新增使用者,並添加使用者資料的過程。
$username = $_POST['username'];
$password = $_POST['password'];
$user_data = [
   'user_login' => $username,
   'user_pass'  => $password,
];

$user_id = wp_insert_user($user_data);
更新使用者
如果需要更新使用者的 metadata,我們可以使用 update_user_meta() 。
wp_update_user(
   mixed $userdata
);
下面我們也來看看怎麼更新使用者的 metadata
$user_id = 1;
$website = 'https://ericwu.asia/';

$user_id = wp_update_user(
   [
      'ID'       => $user_id,
      'user_url' => $website,
   ]
);
順帶一提,如果更新了某個使用者的密碼,Cookies 也會被清除,這個被更新的使用者會需要重新登錄。
删除用户
如果需要刪除使用者,我們可以使用 wp_delete_user()
wp_delete_user(
   int $id,
   int $reassign = null
);
第一個參數顯而易懂,就是刪除哪個使用者的 ID ,第二個參數則是,在我們刪除使用者時,我們還可以選擇要把使用者曾經創建的內容,要重新分配給哪個使用者?
當使用者被刪除後,deleted_user hook 會被執行。有一點要注意一下,如果沒有設置 $reassign 參數,或者該參數不是一個有效的使用者 ID,被刪除使用者創建的對應所有內容也都會被刪除喔!
操作使用者 Metadata
WordPress 的 user 資料中只有包含使用者的基本信息:
- ID
- user_login
- user_pass
- user_nicename
- user_email
- user_url
- user_registered
- user_activation_key
- user_status
- display_name
我們可以增加自己想要的附加資料,這些資料會被存到 wp_usermeta 資料表中,而這個表使用使用者 ID 去和 wp_user 資料表做關聯。
操作使用者 Metadata
在 WordPress 中,有兩種方法可以操作使用者的 metadata。
- 通過個人資料編輯界面中的表單去修改
- 不通過個人資料編輯界面中的表單去修改
通過個人資料編輯界面中的表單去修改
我們先來看看怎麼使用表單來更新使用者 metadata 。簡單來說就是我們讓使用者可以去 WordPress 管理界面查看和編輯使用者資料。
在這之前,我們先了解一下這個過程中使用的 hook 有哪些?
- edit_user_profile: 使用者編輯了自己的配置文件,就會觸發。
- show_user_profile: 使用者編輯了其他人的使用者資料,就會觸發。
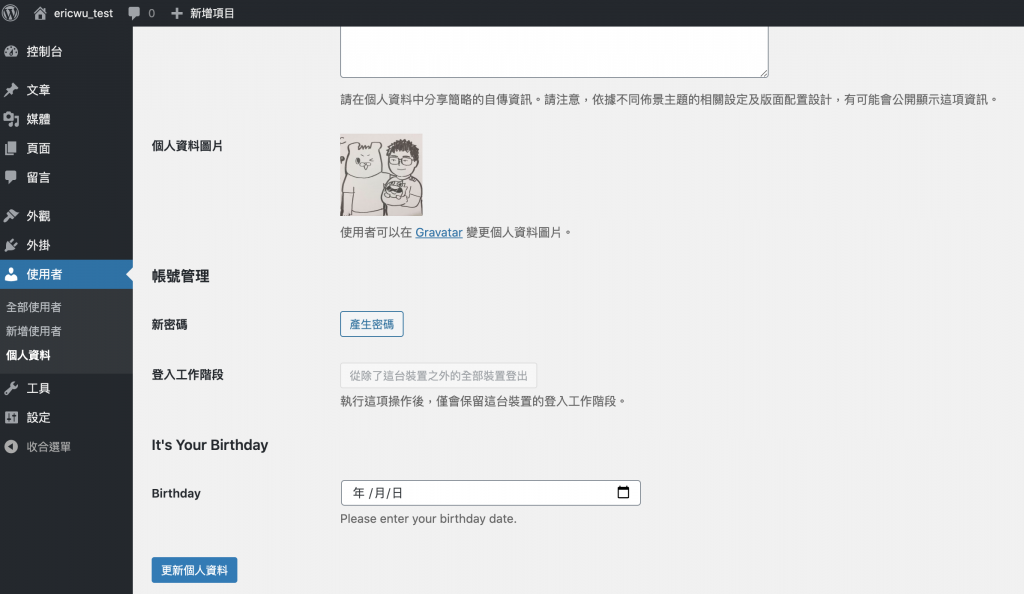
下面,我們將在使用者資料編輯介面中,新增一個生日欄位。
<?php
/*
Plugin Name: eric-plugin
*/

<?php

// 輸出 HTML 表單
function eric_usermeta_form_field_birthday($user)
{
    ?>
    <h3>It's Your Birthday</h3>
    <table class=form-table>
        <tr>
            <th>
                <label for=birthday>Birthday</label>
            </th>
            <td>
                <input type=date
                       class=regular-text ltr
                       id=birthday
                       name=birthday
                       value=<?= esc_attr(get_user_meta($user->ID, 'birthday', true)); ?>
                       title=Please use YYYY-MM-DD as the date format.
                       pattern=(19[0-9][0-9]|20[0-9][0-9])-(1[0-2]|0[1-9])-(3[01]|[21][0-9]|0[1-9])
                       required>
                <p class=description>
                    Please enter your birthday date.
                </p>
            </td>
        </tr>
    </table>
    <?php

}

// 處理這個 metadata
function eric_usermeta_form_field_birthday_update($user_id)
{
    // 確認是否有這權限去編輯
    if (!current_user_can('edit_user', $user_id)) {
        return false;
    }

    // 更新 metadata
    return update_user_meta(
        $user_id,
        'birthday',
        $_POST['birthday']
    );
}

// 新增編輯欄位到使用者管理介面
add_action(
    'edit_user_profile',
    'eric_usermeta_form_field_birthday'
);

// 新增顯示欄位到使用者管理介面
add_action(
    'show_user_profile',
    'eric_usermeta_form_field_birthday'
);

// 在 show_user_profile_update hook 插入剛剛我們定義的 function
add_action(
    'show_user_profile_update',
    'eric_usermeta_form_field_birthday_update'
);

// 在 edit_user_profile_update hook 插入剛剛我們定義的 function
add_action(
    'edit_user_profile_update',
    'eric_usermeta_form_field_birthday_update'
);
太好了!我們現在多了一個生日欄位!
不通過個人資料編輯界面中的表單去修改
這種方法適合用在我們不打算給使用者訪問 WordPress 管理界面的情況下使用。
可用於操作使用者 metadata 的函式包含:add_user_meta(), [update_user_meta()](https://developer.wordpress.org/reference/functions/update_user_meta/, delete_user_meta() 和 get_user_meta()
在這函式中,我們可以只傳遞 $user_id 參數,這樣我們就可以獲取該使用者的所有 meatadata 陣列。
角色和能力
角色和能力是 WordPress 中重要的兩個概念,我們可以用這個來控制使用者的權限。 WordPress 將角色及其能力存在 wp_options 資料表中的 user_roles 欄位中。
角色
角色為使用者定義了一組能力,定義了使用者可以在看到什麼和可以操作什麼。WordPress 的世界中預設有 6 個角色,分別是:
- 超級管理員
- 管理員
- 編輯
- 作者
- 投稿者
- 訂閱使用者
我們可以新增刪除自定義角色(也可以刪除預設的角色)。
新增角色
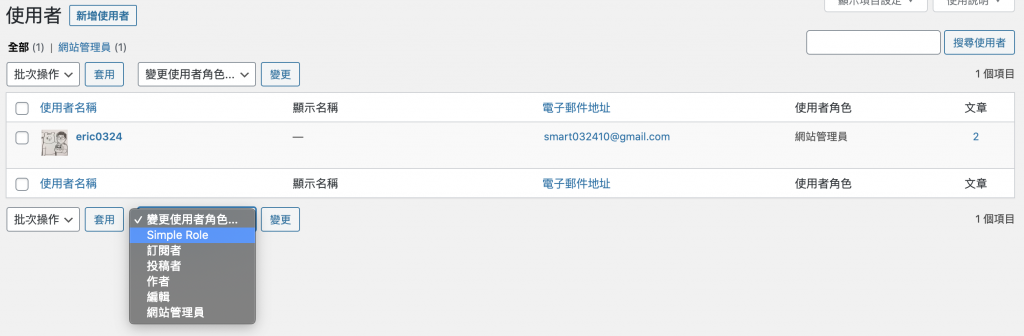
我們可以使用 add_role() 新增新角色並為其分配能力。
function eric_simple_role() {
   add_role(
      'simple_role',
      'Simple Role',
      [
         'read'         => true,
         'edit_posts'   => true,
         'upload_files' => true,
      ]
   );
}

// add the simple_role
add_action( 'init', 'eric_simple_role' );
我們現在多了一個新的角色叫做 simple role
删除角色
如果要刪除角色,我們可以使用 remove_role() 。
function eric_simple_role_remove() {
   remove_role( 'simple_role' );
}

// remove the simple_role
add_action( 'init', 'eric_simple_role_remove' );
能力
能力可以用來定義角色可以做什麼,不可以做什麼。
新增能力
我們可以為角色定義新能力。使用 get_role() 來獲取要新增能力的角色,然後再透過使用 add_cap() 方法,來為角色添加新能力。
function eric_simple_role_caps() {
   // gets the simple_role role object
   $role = get_role( 'simple_role' );

   // add a new capability
   $role->add_cap( 'edit_others_posts', true );
}

// add simple_role capabilities, priority must be after the initial role definition
add_action( 'init', 'eric_simple_role_caps', 11 );
刪除能力
我們可以從角色中移除某個能力,我們使用 remove_cap() 。
使用角色和能力
獲取角色
我們可以通過 get_role() 函式來取得角色和它的所有能力。
get_role(
   string $role
);
判斷使用者能力
我們可以使用 user_can() 函式來檢查使用者是否有指定的角色或是能力。
user_can(
   int|object $user,
   string $capability
);
判斷當前登錄使用者的能力
我們可以直接用 current_user_can() 來判斷當前登錄使用者的能力。
current_user_can() 是 user_can() 的進階版,讓我們可以直接使用當前使用者作為 $user 參數。例如我們要確認現在的這個使用者有沒有權限:
if (current_user_can('edit_posts')) {
   edit_post_link('Edit', '<p>', '</p>');
}
Be First to Comment